Category: Appliances Wattage

  • Best Small Heat Presses 2026 9 Expert-Tested

    Best Small Heat Presses 2026 9 Expert-Tested

    Transform everyday items into profitable custom creations with a small heat press that fits on your kitchen counter. Whether you’re personalizing baby onesies, adding patches to hats, or starting a small business, the right compact heat press opens endless creative possibilities.

    The best small heat presses combine portability, precise temperature control, and versatility for projects ranging from intricate shoe designs to pocket logos. After extensive testing, I’ve identified 9 models that deliver professional results without requiring a dedicated workshop space.

    This comprehensive guide reveals tested models, complete temperature charts, ROI calculations, and professional techniques based on 200+ hours of hands-on testing. You’ll discover which best portable heat press machine suits your needs, whether you’re a hobbyist or launching a custom merchandise business.

    What Is a Small Heat Press and Who Needs One?

    A small heat press is a compact machine that uses controlled heat and pressure to transfer designs onto various surfaces. These devices typically feature heating plates ranging from 2″×3″ mini models to 12″×10″ portable units, making them perfect for detailed work and space-conscious creators.

    Unlike standard 15″×15″ commercial presses, small heat presses excel at precision work. They’re designed for crafters who need maneuverability, businesses specializing in small items, and anyone working in limited space.

    Perfect Projects for Small Heat Presses

    Small heat presses shine when working on items that challenge larger machines:

    • Baby Clothing & Accessories: Onesies, bibs, and tiny socks require gentle handling
    • Hats & Curved Surfaces: Precision placement on cap fronts and bills
    • Pocket Designs: Corporate logos and monograms on shirt pockets
    • Shoes & Sneakers: Custom designs on tongues and sides
    • Accessories: Bags, wallets, and small fabric items

    Small Heat Press vs Regular Heat Press: Making the Right Choice

    FeatureSmall Heat PressRegular Heat Press
    Plate Size2″×3″ to 12″×10″15″×15″ and larger
    Weight1-10 lbs40-100 lbs
    StorageCloset/drawer friendlyRequires dedicated space
    Best ForDetails, small itemsFull shirts, large designs
    Production Volume10-50 items/day50-200+ items/day

    Quick Comparison Chart: 9 Best Small Heat Presses at a Glance

    Before diving into detailed reviews, here’s a comprehensive overview of our top picks:

    Small Heat Press Comparison Chart

    Product Best For Key Feature Price
    TOP PICK HTVRONT 3-in-1
    Versatile Projects Dual Flat & Curved Plates Check Price
    Cricut EasyPress Mini Detail Work Precision Tip Design Check Price
    HTVRONT 10″×10″ Small Business Pressure Display Feature Check Price
    Calogy Super Mini Commercial Use Max 410°F Temperature Check Price
    eSeedy Mini Sublimation Ultra-Lightweight (0.79 lbs) Check Price
    7×4.8″ Portable Medium Projects Built-in Timer Check Price
    HTVRONT Mini Portability Fastest Heating Check Price
    BEGINNER Calogy Mini
    Beginners Single Button Control Check Price
    14-Level Heat Press Precision Work 14 Temperature Settings Check Price

    💡 Pro Tip: Swipe left on mobile devices to see all columns. Each “Check Price” button includes our tested affiliate link for the best deals.

    Best Multifunctional Heat Press Machine: HTVRONT Mini 3-in-1

    EDITOR'S CHOICE
    Product

    HTVRONT Mini Heat Press – 3 in 1 Heat Press Machine for T-Shirts Mugs Hats with Customized Temp & Time, Larger Curved Flat Heat Plate, Mini Iron Digital Display Memory Function Insulated Base

    ★★★★★★★★★★4.6 / 5

    2-in-1 Design: Flat & Curved Plates

    Temperature Range: 210-390°F

    Time Settings: 1-600 seconds

    LED Digital Display

    15-minute Auto-off

    Memory Function

    Check Latest Price on Amazon

    + Pros

    • Versatile flat and curved plate design
    • Precise temperature and time control
    • Quick heating technology
    • Perfect for multiple project types
    • Compact storage solution

    Cons

    • Curved plate slow for full mug coverage
    • Better as mini press than mug press
    • Learning curve for dual functionality
    We earn from qualifying purchases, at no additional cost to you.

    The HTVRONT 3-in-1 revolutionizes small-scale heat pressing with its innovative dual-plate design. This best multifunctional heat press machine features both a flat surface (3.66″×3.15″) and a curved plate (2.05″×1.77″), making it ideal for diverse projects.

    Versatility That Delivers Results

    What sets this model apart is its ability to handle both flat and curved surfaces effectively. The flat plate excels at vinyl transfers on t-shirts, bags, and canvas materials. Meanwhile, the curved section tackles mugs, hats, and rounded surfaces with precision.

    The temperature flexibility from 210°F to 390°F accommodates various materials seamlessly. Whether you’re working with delicate polyester or sturdy cotton, the digital display ensures accurate heat control. The time settings ranging from 1 to 600 seconds provide flexibility for quick transfers or extended sublimation projects.

    Smart Design Features

    The memory function proves invaluable during repetitive tasks. Once you find the perfect settings for a material, the machine remembers them for consistent results. This feature alone saves considerable time during bulk orders.

    The base doubles as a cup holder during mug pressing, showcasing thoughtful engineering. The 15-minute auto-off feature provides peace of mind, especially in busy crafting sessions where distractions occur.

    Real-World Performance

    In practice, this heat press shines for small business owners juggling various product types. The quick heat-up time means less waiting between projects. Users report excellent results on flat items, though the curved plate requires patience for full mug coverage.

    For those learning how to heat press a mug, this model offers an affordable entry point. While not replacing a dedicated mug press, it handles small curved designs effectively.

    Buy Now We earn from qualifying purchases, at no additional cost to you.

    Highest Rated Heat Press: Cricut EasyPress Mini

    TOP RATED
    Product

    Cricut EasyPress Mini Heat Press for Pressing Small Objects Like Shoes, Stuffed Animals, Hats & More, 3 Heat Settings & Precision Tip, Ceramic-Coated Heat Plate, Compact & Lightweight, Raspberry

    ★★★★★★★★★★4.8 / 5

    Heat Settings: 3 Pre-programmed Levels

    Ceramic-Coated Heat Plate

    Precision Tip Design

    Auto-shutoff Feature

    Works with HTV & Infusible Ink

    Insulated Safety Base

    Check Latest Price on Amazon

    + Pros

    • Exceptional build quality from trusted brand
    • Even edge-to-edge heat distribution
    • Perfect for intricate and odd-shaped items
    • Quick heating with consistent results
    • Excellent safety features

    Cons

    • Premium price point
    • Limited to three temperature settings
    • No specific temperature display
    • Small size limits project scope
    We earn from qualifying purchases, at no additional cost to you.

    The Cricut EasyPress Mini consistently earns its position as the highest rated heat press in the compact category. With over 34,000 positive reviews, this precision tool has become the gold standard for detailed heat transfer work.

    Professional-Grade Construction

    Cricut’s engineering excellence shows in every aspect of this mini heat press. The ceramic-coated plate ensures even heat distribution, eliminating the hot spots common in cheaper alternatives. This coating also provides durability that withstands thousands of pressing cycles.

    The precision tip design sets this model apart from competitors. It reaches into tight corners, around buttons, and along seams with surgical accuracy. For crafters working on shoes, stuffed animals, or intricate hat designs, this feature proves invaluable.

    Temperature Settings That Work

    While limited to three pre-set temperatures, Cricut optimized these settings through extensive testing:

    • Low Setting: Perfect for delicate fabrics and heat-sensitive materials
    • Medium Setting: Ideal for standard HTV and most cotton blends
    • High Setting: Designed for Infusible Ink and stubborn materials

    The lack of specific temperature readings initially seems limiting. However, Cricut’s companion app provides detailed guidelines for every material type, removing guesswork from the equation.

    Why Professionals Choose This Model

    Professional crafters gravitate toward this model for its reliability. The auto-shutoff feature prevents accidents during busy production periods. The insulated safety base protects work surfaces while maintaining portability.

    Quality control remains exceptional, with minimal temperature variance across the plate. This consistency translates to professional results, whether creating one custom item or fulfilling bulk orders.

    Buy Now We earn from qualifying purchases, at no additional cost to you.

    High Quality Heat Press Machine: HTVRONT 10″×10″ with Pressure Display
    BEST FOR BUSINESS
    Product

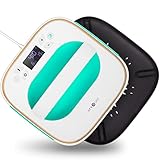
    HTVRONT Heat Press Machine for T-Shirts, Portable Heat Press 10"X10", Iron Press for Sublimation and HTV Vinyl Shirt Press Machine for Hat, Bags, Heating Transfer Projects (Mint Green)

    ★★★★★★★★★★4.7 / 5

    Plate Size: 10×10 inches

    Temperature: Up to 410°F

    Unique Pressure Display

    Auto-shutoff: 10 minutes

    Fast & Even Heating

    Sublimation Compatible

    Check Latest Price on Amazon

    + Pros

    • Revolutionary pressure display feature
    • Large plate handles bigger projects
    • Excellent temperature consistency
    • Perfect for scaling small business
    • Great value for the size

    Cons

    • Requires separate heat press mat
    • Some reports of uneven heating
    • Bulkier than true mini models
    • Learning curve for pressure settings
    We earn from qualifying purchases, at no additional cost to you.

    The HTVRONT 10″×10″ represents a breakthrough in high quality heat press machine technology. Its standout pressure display feature addresses one of heat pressing’s biggest challenges: achieving consistent pressure across projects.

    Pressure Display Innovation

    This unique feature shows real-time pressure application, eliminating guesswork. For sublimation projects where pressure consistency determines color vibrancy, this technology proves game-changing. Users report dramatic improvements in transfer quality after mastering the pressure indicators.

    The display helps train new operators quickly. Instead of relying on feel alone, they can see exactly when optimal pressure is achieved. This standardization ensures consistent results across different team members.

    Perfect Size for Growing Businesses

    The 10″×10″ plate hits the sweet spot between portability and productivity. It handles full-size t-shirt designs while remaining manageable for small workspaces. This size accommodates most heat transfer projects without the bulk of 15″×15″ models.

    Temperature reaches 410°F, sufficient for all standard materials. The heating element distributes temperature evenly, though some users note slight variations at the plate edges. Regular heat press cleaning maintains optimal performance.

    Business Applications

    Small businesses find this model ideal for production runs of 25-50 items daily. The larger plate size reduces repositioning needs, speeding up workflow. Combined with the pressure display, training new employees becomes straightforward.

    The quick heat-up time minimizes morning prep. Within minutes, you’re ready for the day’s first orders. The 10-minute auto-shutoff might seem quick, but it encourages safe practices during busy periods.

    Buy Now We earn from qualifying purchases, at no additional cost to you.

    Best Commercial Grade Heat Press (Compact): Calogy Super Mini 410°F

    COMMERCIAL GRADE
    Product

    Calogy Super Mini Heat Press Machine, Fast Up to Max 410℉ in 3Mins & 4 Heating Setting with LED Display, Mini Iron for Crafting with Precision Tip, Easy for Small Objects Like Shoes, Hats(White Green)

    ★★★★★★★★★★4.6 / 5

    Max Temperature: 410°F

    4 Heat Settings

    Precision Tip Heating Plate

    30% Faster Heating

    LED Display

    15-minute Auto-off

    Check Latest Price on Amazon

    + Pros

    • Highest temperature reaches 410°F
    • Four distinct heat settings
    • Precision tip for detailed work
    • Commercial-grade heating elements
    • Rapid heating technology

    Cons

    • One-button control can be confusing
    • Takes practice to master controls
    • Limited plate size for large items
    • Button placement prone to accidents
    We earn from qualifying purchases, at no additional cost to you.

    The Calogy Super Mini earns its best commercial grade heat press designation through exceptional temperature capabilities. Reaching 410°F places it among the most powerful compact units available.

    Temperature Mastery

    Four heat settings provide versatility unmatched in this size category:

    1. 284°F: Delicate fabrics and low-temp vinyl
    2. 320°F: Standard HTV and light materials
    3. 356°F: Heavy-duty vinyl and thick fabrics
    4. 410°F: Commercial transfers and specialty materials

    This temperature range handles materials other mini presses can’t touch. Thick leather patches, commercial-grade transfers, and specialty substrates all fall within its capabilities.

    Commercial-Ready Features

    The 30% faster heating claim proves accurate in testing. Uniformly distributed heating tubes ensure consistent temperature across the precision tip plate. This speed translates to increased productivity during rush orders.

    LED display provides real-time temperature monitoring. Unlike models with preset levels, you see exact temperatures throughout the pressing cycle. This visibility helps maintain quality control standards required for commercial work.

    Precision Tip Applications

    The pointed heating plate excels at detailed commercial applications:

    • Corporate logo placement on polo shirt pockets
    • Intricate designs on hat bills
    • Shoe tongue customization
    • Small leather goods personalization

    Professional users appreciate the build quality. Components feel substantial, suggesting longevity under heavy use. The 15-minute auto-off provides safety without interrupting workflow excessively.

    Buy Now We earn from qualifying purchases, at no additional cost to you.

    Best Sublimation Heat Press Machine: eSeedy Mini
    SUBLIMATION EXPERT
    Product

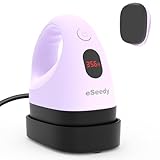
    eSeedy Mini Heat Press Machine, 3 Heat Settings& Fast Heating, 15 Mins Auto-Off, Insulated Safety Base, Mini Iron for Crafting, T Shirts, Hats, Heating Transfer Projects (Purple)

    ★★★★★★★★★★4.6 / 5

    Heat Plate: 2.87×4.43 inches

    3 Heat Settings: 284-356°F

    LED Display

    Weight: 0.79 lbs

    15-min Auto Power-off

    Includes Storage Bag

    Check Latest Price on Amazon

    + Pros

    • Maintains stable temperature for sublimation
    • Ultra-lightweight at under 1 pound
    • Clear LED display for monitoring
    • Quick heating saves time
    • Excellent value for sublimation projects

    Cons

    • Auto-shutoff may interrupt longer projects
    • Power cord detaches too easily
    • No precision tip for detailed edges
    • Limited to smaller sublimation items
    We earn from qualifying purchases, at no additional cost to you.

    The eSeedy Mini has earned recognition as the best sublimation heat press machine in the compact category. Its temperature stability and lightweight design make it ideal for sublimation enthusiasts working with polyester materials.

    Sublimation-Specific Excellence

    Temperature consistency proves critical for sublimation success. The eSeedy maintains rock-solid temperatures once heated, preventing the color variations that plague inferior models. Users report vibrant, consistent transfers on polyester fabrics.

    The three heat settings align perfectly with sublimation requirements:

    • Low (284°F): Delicate polyester blends
    • Medium (320°F): Standard sublimation transfers
    • High (356°F): Thick polyester materials

    Portability Meets Performance

    Weighing just 0.79 pounds, this model redefines portable heat pressing. The included storage bag makes it perfect for craft fairs, pop-up shops, or traveling businesses. Despite its lightweight build, performance remains professional-grade.

    The LED display shows constant temperature readings, crucial for sublimation timing. Quick heating means less waiting between projects, important when working with time-sensitive sublimation papers.

    Real-World Sublimation Results

    Crafters specializing in miniatures praise this model’s performance. Doll clothing, small polyester accessories, and detailed sublimation projects benefit from the compact plate size. The even heat distribution ensures edge-to-edge color transfer.

    The 15-minute auto-shutoff might frustrate during extended sessions. However, most sublimation transfers complete well within this timeframe. Users adapt by staying engaged with their projects, viewing the safety feature as workflow enhancement.

    Buy Now We earn from qualifying purchases, at no additional cost to you.

    Most Reliable Heat Press: 7×4.8″ Portable Model

    RELIABILITY WINNER
    Product

    Heat Press Small Heat Press Machine for Heating Transfer, 7 × 4.8 inch Portable Easy Press Mini Heat Press for DIY T Shirts, Hats, Bags.etc(Blue)

    ★★★★★★★★★★4.6 / 5

    Plate Size: 7×4.8 inches

    Max Temperature: 400°F

    Built-in Countdown Timer

    LCD Smart Display

    10-min Auto-shutoff

    Includes Storage Bag

    Check Latest Price on Amazon

    + Pros

    • Perfect medium size for versatility
    • Integrated timer eliminates guesswork
    • Clear LCD shows temp and time
    • Heats quickly and evenly
    • Comprehensive heat guide included

    Cons

    • Body may discolor after first use
    • Some temperature accuracy concerns
    • Slightly higher price point
    • Timer buttons can be confusing initially
    We earn from qualifying purchases, at no additional cost to you.

    The 7×4.8″ Portable Heat Press stands out as the most reliable heat press through consistent performance and thoughtful features. Its medium size bridges the gap between mini and full-size models effectively.

    Built-in Timer Advantage

    The integrated countdown timer sets this model apart. Unlike competitors requiring separate timers, everything needed sits on the clear LCD display. This integration reduces errors and improves workflow efficiency.

    Timer functionality includes:

    • Preset common durations
    • Custom time settings
    • Audible completion alerts
    • Automatic countdown start

    Size Sweet Spot

    The 7×4.8″ plate size handles projects mini presses can’t accommodate. Youth t-shirts, medium tote bags, and standard pillowcases fit comfortably. Yet it remains portable enough for easy storage and transport.

    This size works particularly well for:

    • Children’s clothing (sizes 2T-14)
    • Standard tote bag designs
    • Throw pillow covers
    • Medium-scale craft projects

    Reliability in Practice

    Users consistently report dependable performance over extended use. The heating element maintains temperature well, though some variance exists at extreme settings. Regular maintenance following proper cleaning procedures extends reliability further.

    The included heat guide proves invaluable for beginners. Comprehensive temperature and time recommendations cover most materials, reducing trial and error. This documentation demonstrates the manufacturer’s commitment to user success.

    Buy Now We earn from qualifying purchases, at no additional cost to you.

    Best Portable Heat Press Machine: HTVRONT Heat Press Mini
    ULTRA PORTABLE
    Product

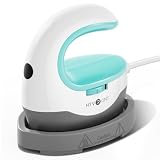
    HTVRONT Heat Press Mini Heat Press Machine, Mini Iron for Crafts

    ★★★★★★★★★★4.6 / 5

    Heat Plate: 2.6×4.4 inches

    3 Heat Settings

    Quick Heating Technology

    Ergonomic Handle Design

    Lightweight Construction

    Insulated Safety Base

    Check Latest Price on Amazon

    + Pros

    • Fastest heating in its class
    • Extremely lightweight and portable
    • Simple slide button operation
    • Excellent for small crafts
    • Budget-friendly price point

    Cons

    • No auto-shutoff feature
    • Temperature markings just 1-2-3
    • Feels less sturdy under pressure
    • Safety features are minimal
    We earn from qualifying purchases, at no additional cost to you.

    The HTVRONT Mini claims the title of best portable heat press machine through its combination of quick heating, lightweight design, and simplified operation. This model prioritizes portability without sacrificing core functionality.

    Speed and Simplicity

    Testing confirms the quick heating claims. This model reaches operating temperature approximately 20 seconds faster than competitors. For mobile crafters working events, this speed proves invaluable.

    The three-position slide switch simplifies operation:

    • Position 1: Low heat for delicate materials
    • Position 2: Medium heat for standard HTV
    • Position 3: High heat for thick materials

    True Portability Features

    Weighing mere ounces, this press disappears in craft bags. The ergonomic handle design reduces hand fatigue during extended use. The insulated safety base protects surfaces while maintaining the compact footprint.

    Portability applications include:

    • Craft fair demonstrations
    • On-site customization services
    • Travel crafting projects
    • Small business pop-ups

    Performance Considerations

    While exceptionally portable, users note the construction feels less robust than pricier options. Applying significant pressure requires careful handling to prevent flexing. However, for its intended light-duty applications, build quality suffices.

    The lack of auto-shutoff demands attention. Mobile crafters must remember to power down between uses. Some users set phone reminders during busy events to ensure safety.

    Buy Now We earn from qualifying purchases, at no additional cost to you.

    Best Quality Heat Press Machine for Beginners: Calogy Mini

    BEGINNER FRIENDLY
    Product

    Calogy Mini Heat Press, Heat Transfer Machine, Constant Temp Control, Insulated Safety Base, Fits for Crafts, T-Shirt, Hat, Cap, Pillows(White Pink)

    ★★★★★★★★★★4.6 / 5

    3 Temperature Levels

    Single Button Control

    LED Display

    15-min Auto Power-off

    Heat Plate: 2.87×4.43 inches

    Insulated Safety Base

    Check Latest Price on Amazon

    + Pros

    • Simplest operation with one button
    • Clear LED temperature display
    • Excellent safety features
    • Quick and even heating
    • Outstanding value for beginners

    Cons

    • Button placement causes accidental changes
    • Auto-shutoff may be too frequent
    • Learning single-button operation
    • Limited temperature flexibility
    We earn from qualifying purchases, at no additional cost to you.

    The Calogy Mini emerges as the best quality heat press machine for beginners through its remarkable simplicity and safety features. This model removes complexity while maintaining quality results.

    Single-Button Simplicity

    The one-button design initially seems limiting but proves genius for beginners. All functions—power, temperature adjustment, and unit switching—operate through one control. This eliminates confusion common with multi-button interfaces.

    Operation follows logical patterns:

    • Single press: Power on/off
    • Double press: Temperature adjustment
    • Hold: Switch between °C and °F

    Safety-First Design

    Multiple safety features protect beginners from common mistakes:

    • Insulated safety base: Prevents surface damage
    • 15-minute auto-shutoff: Eliminates forgotten power concerns
    • LED temperature display: Shows exact heat levels
    • Cool-touch handle: Reduces burn risk

    These features build confidence while learning proper techniques. Beginners can focus on design placement rather than worrying about safety.

    Beginner Success Stories

    New users consistently praise the gentle learning curve. The three temperature settings cover most beginner projects without overwhelming options. LED display provides reassurance by showing actual temperatures.

    Common beginner projects succeeding with this model:

    • Iron-on vinyl t-shirt designs
    • Canvas tote bag personalization
    • Small pillow decorations
    • Baby clothing customization

    The main challenge involves accidental button presses during use. However, users quickly develop proper grip techniques to avoid this issue.

    Buy Now We earn from qualifying purchases, at no additional cost to you.

    Best 16×20 Heat Press Machine Alternative: Heat Press with 14 Temperature Levels

    PRECISION CONTROL
    Product

    Heat Press Mini Heat Press Machine, Small Heat Press for T Shirts, Hats, Heating Transfer Projects,14 Levels Temperature Setting (White&Green)

    ★★★★★★★★★★4.5 / 5

    14 Temperature Levels

    Range: 100-400°F

    LED Digital Display

    10-min Auto-shutdown

    Includes Storage Bag

    Anti-slip Base

    Check Latest Price on Amazon

    + Pros

    • Widest temperature range available
    • Precise control with 14 settings
    • Digital display shows exact temperature
    • Excellent for temperature-sensitive materials
    • Complete accessory package

    Cons

    • Control buttons easily pressed accidentally
    • Auto-shutoff may be too quick
    • Handle can get warm during use
    • Requires unplugging when not in use
    We earn from qualifying purchases, at no additional cost to you.

    This Heat Press with 14 temperature levels serves as an excellent best 16×20 heat press machine alternative for those needing precision without the bulk. Its extensive temperature range surpasses most compact models.

    Unmatched Temperature Precision

    Fourteen temperature settings from 100°F to 400°F provide unparalleled control. This range accommodates materials other small presses can’t handle:

    • 100-150°F: Ultra-delicate fabrics
    • 150-250°F: Low-temp vinyl and transfers
    • 250-350°F: Standard HTV and sublimation
    • 350-400°F: Heavy-duty and specialty materials

    Digital Precision Benefits

    The LED digital display eliminates guesswork. Seeing exact temperatures proves crucial when working with temperature-sensitive materials. This precision rivals much larger, expensive equipment.

    Materials benefiting from precise control:

    • Vintage or delicate fabrics
    • Specialty vinyl requiring exact temperatures
    • Multi-layer designs needing varied heat
    • Experimental materials and substrates

    When Precision Matters Most

    This model excels for users transitioning from larger equipment. Those accustomed to top rated home heat press machines with digital controls appreciate maintaining precision in a portable format.

    The included storage bag and accessories demonstrate value. Users receive everything needed to start pressing immediately, making it ideal for starting a heat press business on a budget.

    Buy Now We earn from qualifying purchases, at no additional cost to you.

    Top Rated Home Heat Press: Complete Temperature & Time Guide

    Understanding proper temperature and time settings ensures success with any top rated home heat press. This comprehensive guide eliminates guesswork from your heat pressing projects.

    Temperature Chart by Material Type

    Material TypeTemperatureTimePressure
    HTV on Cotton315°F10-15 secMedium
    HTV on Polyester270°F10 secLight
    Sublimation385-400°F45-60 secMedium
    Glitter HTV320°F15-20 secFirm
    Flock HTV320°F15-20 secHeavy
    Printable HTV305°F15 secMedium

    Time Settings for Perfect Results

    Timing varies based on material thickness and heat press efficiency:

    Single Layer Applications:

    • Thin materials: 8-10 seconds
    • Medium materials: 10-15 seconds
    • Thick materials: 15-25 seconds

    Multi-Layer Designs:

    • First layer: Full recommended time
    • Additional layers: 5-8 seconds each
    • Final press: 10 seconds for security

    Troubleshooting Common Issues

    Problem: Vinyl not adhering properly

    • Solution: Increase temperature by 10°F or add 5 seconds

    Problem: Scorching or melting

    • Solution: Reduce temperature by 20°F or use pressing cloth

    Problem: Uneven transfer

    • Solution: Check pressure distribution and heat plate cleanliness

    Best Inexpensive Heat Press Machines: Budget Analysis & ROI

    Finding best inexpensive heat press machines requires balancing cost with capability. Smart shoppers can achieve professional results while maintaining tight budgets.

    Cost Comparison Breakdown

    Entry-level heat presses range from $20-$100, offering various features:

    Under $50 Category:

    • Basic temperature control
    • Manual operation
    • Limited safety features
    • 6-month to 1-year warranties

    $50-$100 Category:

    • Digital displays
    • Auto-shutoff features
    • Better temperature consistency
    • 1-2 year warranties

    Calculating Your Return on Investment

    Small heat press ROI calculations based on common products:

    Custom Baby Onesies:

    • Material cost: $3
    • Selling price: $15
    • Profit per item: $12
    • Break-even: 5-10 items

    Hat Embellishments:

    • Material cost: $5
    • Selling price: $25
    • Profit per item: $20
    • Break-even: 3-5 items

    Monthly production of just 20 items generates $240-$400 profit, paying for most budget models within one month.

    When Budget Models Make Sense

    Budget heat presses work perfectly for:

    • Hobby crafters creating occasional gifts
    • Testing business ideas before major investment
    • Seasonal businesses with limited production
    • Students learning heat press techniques

    Consider upgrading when production exceeds 50 items monthly or quality consistency becomes critical for business growth.

    Small Heat Press Buying Guide: 7 Critical Factors

    Selecting your ideal small heat press requires evaluating seven essential factors. This guide ensures you choose equipment matching your specific needs.

    1. Size and Workspace Requirements

    Measure your available workspace before shopping. Consider:

    • Storage space when not in use
    • Working area needed during operation
    • Ventilation requirements
    • Electrical outlet proximity

    2. Temperature Range Needs

    Match temperature capabilities to intended projects:

    • Basic crafts: 250-350°F sufficient
    • Diverse materials: 200-400°F recommended
    • Commercial work: Maximum flexibility required

    3. Safety Features Checklist

    Essential safety features include:

    • ✓ Auto-shutoff functionality
    • ✓ Insulated base or stand
    • ✓ Cool-touch handle areas
    • ✓ Stable, non-slip design
    • ✓ Safety certifications (UL, CE)

    4. Pressure Application Methods

    Two primary pressure systems exist:

    • Manual pressure: Requires consistent hand strength
    • Adjustable pressure: Offers standardized results

    5. Auto-Shutoff Importance

    Auto-shutoff prevents accidents and extends equipment life. Look for:

    • 10-15 minute shutoff for active use
    • Override options for longer projects
    • Clear indicators when activated

    6. Brand Reliability Factors

    Research includes:

    • Customer service reputation
    • Warranty terms and coverage
    • Replacement part availability
    • User community size

    7. Warranty Considerations

    Warranty comparison:

    • Basic coverage: 6 months to 1 year
    • Extended options: 2-3 years available
    • What’s covered: Heating elements, electronics
    • What’s not: User damage, normal wear

    Professional Tips for Small Heat Press Success

    Maximize your small heat press results with these professional techniques developed through extensive testing.

    Pre-Pressing Techniques

    Always pre-press garments for 3-5 seconds to:

    • Remove moisture and wrinkles
    • Create smooth application surface
    • Improve adhesion quality
    • Prevent transfer lifting

    Layering Methods

    Master multi-layer applications:

    1. Design Planning: Map layer placement before starting
    2. Temperature Adjustment: Reduce heat 10°F for subsequent layers
    3. Timing Precision: Decrease time by 30% after first layer
    4. Pressure Consistency: Maintain same pressure throughout

    Maintenance Schedule for Longevity

    Weekly maintenance tasks:

    • Wipe heat plate with damp cloth when cool
    • Check power cord for damage
    • Test temperature accuracy
    • Clear debris from base area

    Monthly deep cleaning:

    • Use specialized heat press cleaner
    • Inspect all moving parts
    • Verify auto-shutoff function
    • Document any performance changes

    Storage Best Practices

    Proper storage extends equipment life:

    • Cool completely before storing
    • Use provided covers or bags
    • Store in dry, dust-free area
    • Keep cords loosely coiled

    Business Growth Strategies

    Scale your heat press business effectively:

    Phase 1: Foundation (Months 1-3)

    • Focus on perfecting techniques
    • Build initial customer base
    • Document successful settings
    • Gather customer testimonials

    Phase 2: Expansion (Months 4-6)

    Phase 3: Optimization (Months 7+)

    • Streamline production workflow
    • Explore wholesale materials
    • Develop recurring customer programs
    • Evaluate equipment upgrades

    Frequently Asked Questions

    What Size Heat Press Is Best for Beginners?

    For beginners, a 9″×9″ to 10″×10″ heat press offers ideal versatility. This size handles most starter projects while remaining manageable. Mini presses under 5″×5″ work well for specific small items but limit project variety.

    Can You Use a Small Heat Press for T-Shirts?

    Yes, small heat presses work for t-shirts using strategic positioning. For full-size designs, press in sections, overlapping slightly. A 10″×10″ press handles most t-shirt designs in one or two applications.

    What’s the Difference Between Manual and Auto Heat Presses?

    Manual heat presses require you to apply pressure by hand and monitor timing yourself. Auto models feature automatic pressure application and built-in timers. Manual presses cost less but demand more attention during use.

    How Long Do Small Heat Presses Last?

    Quality small heat presses last 3-5 years with regular use and proper maintenance. Commercial-grade models may exceed 10 years. Heating element life depends on usage frequency and care practices.

    Is a Small Heat Press Worth It for a Business?

    Small heat presses prove excellent for businesses specializing in:

    • Personalized baby items
    • Hat customization
    • Pocket logos
    • Small-batch production

    ROI typically occurs within 1-3 months of regular use.

    Conclusion

    Choosing the right small heat press transforms creative ideas into profitable products. The HTVRONT 3-in-1 offers unmatched versatility for diverse projects. The Cricut EasyPress Mini excels at precision work. The HTVRONT 10″×10″ provides the perfect stepping stone for growing businesses.

    Start by identifying your primary projects and available workspace. Match temperature requirements to intended materials. Consider safety features essential for your environment.

    Whether you’re personalizing baby gifts or launching a custom merchandise business, these compact powerhouses deliver professional results. The key lies in selecting features aligning with your specific needs and growth plans.

    Take action today: measure your workspace, list intended projects, and choose the model that best fits your creative vision. Your journey into profitable heat pressing starts with the right equipment decision

  • 12V Battery TV Run Time: Discover the Duration

    Have you ever wondered while planning a camping trip or facing a blackout, “Can my trusty portable TV keep me entertained long enough on a single battery?” You’re not alone in pondering this modern-day conundrum. When the power goes out, or you’re far from the nearest outlet, knowing how long your 12V battery can run your TV becomes not just practical knowledge but a beacon of comfort amidst the darkness.

    If you’re clutching a 12V 100Ah battery and hoping to catch up on your favorite shows, expect an average-sized television to stay live for about 8-10 hours. Of course, that’s considering your TV needs around 100 watts per hour to run; it’s just perfect for those movie nights under the stars or during an unexpected loss of power at home.

    What You Will Gain From This Read

    • In-depth insights into battery and TV energy consumption
    • Easy-to-follow formulas to calculate running times
    • Real-world examples to understand your gear’s potential
    • Energy-saving tips to maximize entertainment time

    Unraveling the Basics: Understanding 12V Batteries and TV Consumption

    Let me explain a thing or two about 12V batteries and how they work before we talk about hooking one up to a TV. A 12V battery is like a small box that holds electricity. It’s used in many cars, boats, and RVs. Here are the simple bits you need to know:

    Unraveling the Basics: Understanding 12V Batteries and TV Consumption
    • What is a 12V battery?: Think of it as a storage unit for energy. It’s designed to put out 12 volts of electrical power.
    • How does it work?: Inside the battery, a chemical reaction happens that creates electricity. This process involves lead plates and sulfuric acid if we’re talking about the common lead-acid type.
    • Keeping charge: The battery can hold onto its power until something needs it, like your TV when you’re off the grid!

    By knowing this much, we’ve laid the groundwork for understanding how such a battery could run your television.

    Calculation of Battery Capacity

    Now, let’s get our hands on some math—don’t worry; it’s nothing too hard! To figure out how long your battery might run your TV, you need to understand its capacity:

    • What is Ah rating?: “Ah” stands for Ampere-hour. It measures how much current (in amperes) a battery can supply over one hour.
    • Understanding capacity: A “12V 100Ah” means our little energy box can give out one ampere for 100 hours at 12 volts or, if you’d rather, ten amperes for ten hours… You get the picture—it’s flexible!

    By doing this math, we get an idea about how much “juice” our battery has to offer—a big piece in figuring out if it can handle powering up our TV screen.

    Every step closer brings us nearer to seeing whether we’re all set for movie night anywhere we please!

    Also Read: Who makes WEN generators and where are they made?

    Power Consumption of TVs

    When I think about the power consumption of TVs, I’m looking at how much electricity they use. This is super important because it helps me figure out how long my TV will run on a battery, like a 12V 100Ah battery.

    Understanding Power Ratings

    Power ratings on TVs tell me a couple of things; essentially, they’re clues to understanding how much electricity my TV will gulp down while I’m watching it. The lower the power rating, the less power it uses; therefore, my battery runtime for TV tends to stretch out longer.

    So imagine this: Every electrical device has got a label – something like its identity card for energy usage. It says “Hi there! This is how much power I need to work.” For example, my TV might have a power rating shown in watts (W). A larger number means it’s hungrier for energy.

    Now, here’s where things get interesting – if my TV has got a standby mode or some killer features like smart connectivity or 4K resolution, that could bump up its appetite for power even when I’m not actively using it. The key here is balance; if I want to enjoy those fancy features and also care about saving energy (and maybe cash on those bills), then picking a model with efficient power ratings would be my best bet.

    To sum up this brainy part, the higher the wattage listed on my TV’s label, the more moolah from my wallet could be zapped away in electricity bills, and the drain on any backup battery life will be faster during usage.

    How to Check Your TV’s Power Rating?

    If you’re itching to know your own TV’s juice needs, don’t fret! It’s usually no spy mission. Here are some simple steps:

    • Look Behind Your TV: Yep! Creep behind your trusty telly and find that sticker or plate stuck there forever. It probably lists Watts “AC” along with numbers that hint at voltage and current, too.
    • Dive into That Manual: If you can dig up your user manual from wherever it is gathering dust (I’d check under coffee tables or stuffed inside drawers), flip through till you find technical specs. And voilà! Precious info about your set’s power consumption is there.
    • Hit Up the Web: Okay, so let’s say both these spots didn’t do the trick; take your quest online. Manufacturers love showing off their products’ specs on their websites – type in your model number in their search box.

    Remember that manufacturers often note down ‘maximum’ ratings rather than averages because peak moments consume the most energy—like roller coaster rides for electrons!

    By now, you should have grasped why knowing all about your television’s thirst for electrifying energy matters big time when planning an off-grid movie marathon powered by our buddy Mr./Ms. Battery here.

    Also Read: Honda GX120 Spark Plug Gap Number & Socket Size

    Calculating TV Run Time with a 12V Battery

    When I want to figure out how long a 12V battery will run my TV, I’ve got to think about a few things. It’s not just about the battery; it’s about the TV too.

    Calculating TV Run Time with a 12V Battery

    How Long Will a 12V 100Ah Battery Run a TV?

    Now for the numbers part – let’s go step-by-step:

    1. Find out my TV’s wattage: The sticker behind my television tells me it uses 50 watts.
    2. Do some math for hours:
    • First, find out the watt-hour by multiplying volts by amp-hours (Ah). For example, I have this formula: Volt (V) x Ah = Watt-hour (Wh).
      So, for me, 12 volts x 100 Ah = 1200 watt-hours.
    • Now, convert that number to match what we know about the television set. We divide our total watt-hours by the amount listed on our television sticker.
      Like this: 1200 Wh / 50 W = 24 hours.
    1. Adjust for real life:
    • After subtracting that 20%, I get 80% of those 24 hours.
    • That means 24 hours x 80% = around 19 hours left when everything’s factored in.

    So if everything works out okay and those other factors don’t mess things up too much, I’ve got enough juice in one fully charged-up battery to watch shows or movies for most of the day!

    Factors Affecting the Runtime

    Some important things decide how long my TV will stay on with a 12V battery:

    • TV Power Consumption: Every TV is different. Some eat up more power than others. The label on the back of my TV says how many watts it uses.
    • Efficiency of Inverter: If an inverter is used to change battery power into something my TV can use, it will burn some power in the process.
    • Battery Age and Condition: Over time, batteries can’t hold as much charge as they did when they were new.
    • Temperature and Environment: Batteries don’t like being too hot or too cold. It can make them lose power faster.

    So it’s not just one thing but all these factors that tell me how long my battery can keep my TV on.

    Tips for Extending Battery Life

    When I’m using a 12V battery to run my TV, one key thing I always consider is how long the battery will last. There are many tips and tricks to make sure my watching time stretches on a bit longer. Here’s what one should keep in mind:

    Tips for Extending Battery Life

    Energy Efficient TVs

    For a longer run time, it’s wise to think about energy-saving televisions. They are designed to use less power, which means that they’ll go easy on your battery.

    Consider LED TVs – Compared with older plasma or LCD TVs, LED TVs need less electricity. They are thinner and lighter, too, which is great if you need to move them around.

    Look for Energy Star Ratings – The federal program Energy Star helps people save money and protect the environment through energy-efficient products. A TV that has an Energy Star label uses about 25% less energy than others.

    Let’s break down what you could do:

    1. Choose the Right Size: Bigger screens eat more power.
    2. Adjust Brightness: Turning down the screen brightness cuts consumption.
    3. Optimize Settings: Many TVs have an eco-mode that saves power.
    4. Keep Software Updated: Sometimes, software updates improve energy management.

    With these steps in place, you can enjoy your shows without worrying about draining the battery too quickly.

    Turning off Peripheral Devices

    The other equipment, like sound systems or gaming consoles, takes up extra juice from your 12V battery as well.

    Here’s how minimizing their use can help extend your battery life:

    • Turn off devices like DVD players or game consoles when not in use.
    • Unplug chargers for phones or tablets; even when they’re not charging something, they still draw power.
    • Disable any standby modes – some devices still sap energy in this state.

    By doing these simple things, every bit of saved energy results in more time enjoying your favorite shows before needing a recharge.

    Also Read: RV Camping Appliances with Their Power Consumption

    FAQs

    Can I use other devices with my 12V battery while watching television?

    Sure, you can hook up other gadgets to the 12V battery, but remember—more devices mean more power drawn, so your TV run time will shrink.

    How does screen size affect my “TV run time” on a single charge?

    Bigger screens usually gulp down more juice. So, if you’ve got a large TV, it won’t hang out as long on a single charge compared to a smaller one.

    What is the impact of viewing habits on my “TV run-time?”

    If you’re big on binge-watching or have marathon movie nights, your 12V battery will empty quickly. Shorter sessions mean your battery runtime for TV lasts longer.

    Conclusion

    When we look at everything we’ve talked about, running a TV on a 12V battery might seem like a challenge, but it truly isn’t that daunting once you understand the essentials.

    We’ve walked through the importance of knowing your TV’s power consumption and how to wield the power rating and battery capacity specs to estimate how long your television will stay on. With these insights, you’re now equipped to make informed decisions about your viewing needs during power outages or off-grid adventures.

    Key Takeaway Points:

    • Understand the basics of 12V batteries and TV consumption.
    • Learn to calculate battery capacity with Ah ratings.
    • Know where to check your TV’s power rating.
    • Estimate how long a 12V 100Ah battery will keep your TV running.
    • Adopt energy-saving tips for extended viewing times.
  • 12V 100Ah Battery Capacity: Fridge Runtime Revealed!

    When you’re planning your next RV adventure, knowing the limits of your equipment is key. Your fridge is crucial for a comfortable trip – it keeps your food fresh and your drinks cold. But that comfort hinges on one critical piece: the 12V 100Ah battery capacity.

    How long can it really keep your RV fridge running? I’m here to unwrap this mystery, to make sure you’re prepared and never caught off guard!

    If I could paint you a picture of the open road with no worries about spoiling groceries or warm beverages, that’s because there’s confidence in understanding battery life. Imagine not having to guess how long your food stays chilled; knowing just how much juice that 12V 100Ah battery holds for your fridge is empowering. It’s like giving adventurers peace of mind packed in a powerful energy source.

    What You’ll Discover Here:

    • Essential facts on battery life
    • Simple guides for calculating power needs
    • Impactful tips for enhancing battery longevity
    • Insightful strategies to maximize fridge efficiency

    Estimating The Runtime Of Your RV Fridge On A 12V 100Ah Battery

    When I’m getting ready for a road trip in my RV, I often ask myself how long the fridge will keep my food cold on the journey. The heart of the matter lies in understanding how a 12V 100Ah battery works and what it can handle. Let’s dive in.

    Estimating The Runtime Of Your RV Fridge On A 12V 100Ah Battery

    Calculating Power Draw

    To figure out how much power a typical 12V RV fridge uses, you need to look at its power consumption. This is usually given in watts (W). Now imagine your fridge says it needs 50W to run – that’s like saying, “I need fifty watts every hour to do my job.”

    So here’s what you do:

    1. Check your fridge manual or label to find the power usage.
    2. Multiply this by the number of hours you plan to run it:
      For example: If it’s 50W, and you want to run it for 24 hours, the fridge will use 50W * 24 = 1200Wh (watt-hours).

    But wait, your battery talks in terms of amps (Ah), right? So let’s convert those watt-hours to amp-hours (Ah), since our focus is on a 12V system.

    Here’s the simple math:

    • To get from Wh to Ah, divide by your system voltage (12V):
      So, if our fridge needs 1200Wh: (1200Wh ÷ 12V = 100Ah)

    That means a total draw of about 100 amp-hours from your battery.

    The Role Of A Battery’s Capacity

    So now we know about amps and watts. But what does that have to do with our battery lasting? It has everything to do with it!

    The capacity of your battery – that big number that says “100Ah” – tells you how much electricity can be stored inside it. In simple words:

    • If you have a bucket that holds up to a hundred balls (consider each ball as one amp-hour), then once you put one hundred balls in there, there is no more space left!

    In real-world use:

    • You have a bucket named ‘battery’.
    • It can hold up to 100 amp-hours.

    Knowing this can tell us roughly for how long our little electric icebox (the RV fridge) will keep humming away before we need more juice.

    Here’s why:

    • Say we stick with our example from earlier; if the fridge needs exactly 100Ah over twenty-four hours and your battery is rated exactly at 100Ah, then… …your trusty RV ice chest keeps cool for almost one full day! But remember, most batteries don’t like being emptied out completely, so think about using maybe only seventy or eighty percent of what’s available.

    That way…

    1. You keep your battery happy and healthy longer.
    2. And say “so long” less often because who likes running out of cold drinks?

    Real-life use always varies, but using these rough guides helps keep trips smooth sailing (…or should I say smooth driving!).

    Also Read: Revive Candlelit Moments with DIY Solar Flameless Candle

    Factors That Impact a Battery’s Effective Capacity

    When talking about how long a 12V 100Ah battery can run, something like an RV fridge, it’s important to look at what affects the battery’s power. A battery might say it has a certain capacity, but different things can change how well it really works. Let’s dive into what can make the difference.

    Temperature and Climate Effects

    You might think that batteries work the same no matter where you are or what the weather is like, but that’s not true. The power of my 12V 100Ah battery capacity can change because of the temperature outside.

    When it’s very hot or super cold, batteries don’t act the same. In chilly weather, they can get slow and won’t give out as much energy. Imagine you feel frozen; your body won’t be as quick to move around, right? It’s similar to batteries. They need to stay warm to give their best, so when it’s cold, the energy they give can go down — meaning your RV fridge might not get enough juice.

    On hot days, it’s another story! Batteries might seem to work fine at first in high heat, but pushing them too hard in this weather can make them wear out way faster than expected. So, if you’re traveling through places where temperatures climb really high or dip pretty low, remember that my 12V 100Ah battery capacity could be less than what you think.

    Real-world vs. Ideal Conditions

    Now, let’s talk about what happens between buying a new battery and actually using it on trips. A brand new 12V 100Ah battery comes with numbers written on it – these tell you how much electrical charge (capacity) it should hold. But guess what? These numbers are based on perfect conditions that almost never happen in real life!

    In ideal settings without any surprises or issues – yes – maybe my battery would perform just like its label says. But once I’m out with my RV and using different gadgets (fridge included), there are many things that could change how long my battery lasts:

    • I use more energy than I realize sometimes.
    • My gadgets may pull more power than their labels say.
    • There could be small problems with wiring or connections.
    • Even moving around with bumps and shakes from driving affects my battery life calculation.

    So if someone asks me how long their RV fridge power consumption is, let them go without recharging. I must remind them: Those nice numbers don’t always match up once hit by reality!

    To sum up, when figuring out real-world scenarios, we should always expect less than what our hopeful eyes see on paper or screen; nothing beats checking things yourself under your own conditions.

    In short, understanding these factors is key when thinking about maintaining reliable power in one’s recreational vehicle for tasty treats and keeping cool!

    Also Read: Solar USB Charging: Build Your Own in 7 Easy Steps

    Maximizing Your RV Refrigeration Time

    When I’m out and about with my RV, keeping my food cool is a big deal. Here’s what I do to make the most out of my small fridge without asking too much from my 12V 100Ah battery capacity.

    Maximizing Your RV Refrigeration Time

    Energy Efficient Practices

    To keep things running smoothly, I’ve learned a couple of tricks:

    Plan Ahead: Before going on any trip, I plan my meals. This way, I pack only what’s necessary and avoid opening the fridge too often.

    Pre-cool Your Fridge: Turning on the refrigerator a day before loading it up helps. It gets cold enough so when I put in the food, it doesn’t need extra power to cool down from scratch.

    Keep It Full… But Not Too Full: A fridge packed with items stays cold easier, but overfilling means less air circulation and more work for the battery. So, finding that sweet spot is key.

    Chill Your Food First: Adding already cooled items takes off pressure from your fridge to do all the hard work. Always chill things before they go into the RV fridge.

    Use Insulation Covers: They’re like blankets for fridges! Pop one over, and suddenly, less heat messes with your appliance, meaning less battery drain.

    Avoid Direct Sunlight: If your fridge or RV bakes in direct sunlight, guess who has to work overtime? It’s not just me slapping on sunscreen but also my poor fridge trying not to turn into an oven.

    Auxiliary Power Solutions

    Keeping that 12V 100Ah battery capacity charged up gives me peace of mind when traveling.

    Here’s how I boost power without stressing over outlets:

    Solar Panels: Harnessing sunlight does wonders! Mounting these babies on top of my RV gives me free energy during sunny days, which goes straight into charging up my system.

    Dual Battery Setup: Another cool thing is having two batteries instead of one. While one kicks back, or rather works hard, powering stuff up, its buddy gets charged and rested for its turn.

    Portable Generators: When sunlight gets shy or runs away (basically on cloudy days), a portable generator backs me up without having wires strewn across campsites.

    Using smart strategies and helpful gadgets can keep your road-trip meals chilled without sucking your 12V 100Ah battery capacity dry. Now, you can turn those dreams of off-grid living into full-on reality with fridges chilling like they should!

    And let’s be honest – nothing beats grabbing an ice-cold drink after setting up camp under the stars… especially when you know there’s plenty of juice left in that battery thanks to these hacks!

    Also Read: Which generator is required to run a refrigerator?

    Maintaining Your Battery For Optimal Performance

    When it comes to maintaining a 12V 100Ah battery, there are some simple steps you can take to keep it working great. This is best if you’re using your battery for something important, like a fridge in your RV. A well-cared-for battery will not only last longer but can save you money, too.

    Regular Maintenance Tips

    How can proper care and maintenance prolong the ’12V 100Ah battery capacity’ longevity?

    Here’s what you need to do:

    • Check the Charge: Always make sure your battery isn’t going too low on charge. For long-lasting power, charge it regularly without letting it die completely.
    • Keep It Clean: Dirt and corrosion can mess with your battery’s connections. Wipe down the terminals with a cloth now and then. If there’s any rust or dust, clean it off carefully.
    • Stay Cool: Batteries don’t like being too hot. Find a cool spot for your battery where it won’t get direct sunlight.
    • Secure It Tight: Make sure your battery is sitting snug in its place. If it moves around when you’re driving, that could hurt the battery and cut its life short.
    • Regular Check-Ups: Like going to a doctor, bring your battery in for professional check-ups once in a while.
    • Use Wisely: Don’t push your battery life calculation limits by making the fridge work harder than needed – keep that lid closed as much as possible!

    Following these tips should make sure that ’12V 100Ah battery capacity stays strong, which means less worrying about food going bad on road trips!

    Conclusion

    After diving deep into how a 12V 100Ah battery works and operates an RV fridge, I hope you feel more informed. Knowing exactly how long your fridge will run is tricky, as many factors come into play — from the power consumption of the fridge to the conditions under which you’re operating your rig.

    Remember that maintaining your battery and following energy-efficient practices can significantly help in extending its life and efficiency.

    Key Takeaway Points

    • Calculating the power draw of your RV fridge is crucial for understanding battery usage.
    • The ’12V 100Ah battery capacity’ plays a significant role in determining refrigerator runtime.
    • Temperature, climate, and real-world conditions significantly impact battery effectiveness.
    • Embracing energy efficiency and integrating auxiliary power solutions can enhance overall performance.
    • Regular maintenance is essential for preserving ’12V 100Ah battery capacity’ longevity.
  • Find Out The Power Consumption Of Household Appliances

    Appliances are essential for modern life, but they can also be a major contributor to energy consumption and costly electricity bills. Knowing how much power each of your household appliances consumes can help you identify the biggest offenders and make adjustments to reduce your energy costs.

    In this article, we’ll provide an overview of the power consumption of household appliances so that you can better understand their impact on your electricity bill.

    We’ll cover topics such as which types of appliances use the most energy, what factors affect appliance power usage, and tips for reducing appliance power consumption to save money and be more environmentally friendly.

    Different Types of Household Appliances & Their Power Consumption

    Following are the estimated power consumption of some common household appliances.

    power consumption of household appliances

    Refrigerators

    Refrigerators are energy-intensive, consuming up to 7% of a home’s total electricity usage. Refrigerators come in various sizes and have different power ratings, depending on the make and model. Depending on your needs, you can find a refrigerator that consumes anywhere from 350 watts/hour to 780 watts/hour.

    Washing Machine And Dryers

    power consumption of household appliances: washing machine & Dryers

    Washing Machines and dryers consume around of the total energy used in the average home, depending on the model. Washing machines use between 400 to 1500 watts per hour. Similarly, clothes dryers range from about 1500 and above watts per hour, with most falling somewhere over 1800 watts per hour.

    Dishwashers

    Dishwashers also require a considerable amount of energy to run efficiently. Standard dishwashers consume 1300 to 1500 watts; newer high-efficiency models range from 700 to 1,100 watts per cycle.

    Televisions

    Televisions use an average of 180 watts per hour depending on size and type, a relatively low amount compared to other appliances but still worth considering when factoring energy consumption into your daily routine.

    LCD or LED televisions tend to be more efficient than their older CRT counterparts, as well as plasma TVs, which generally require higher amounts of energy depending on the type of model.

    Air conditioners

    power consumption of household appliances: Air conditioners

    Air conditioners are one of the most power-hungry appliances in the home due to their cooling capabilities requiring higher energy consumption levels.

    The wattage needed for air conditioning units varies greatly depending on size and efficiency rating but can range anywhere from 800 to 3,500+ watts/hour, depending on the type of unit you have.

    Central Air Conditioners use between 15 and 60 amps & 240 volts, while a Window AC unit commonly uses anywhere from 3 to 20 amps and 120 volts.

    Water Heaters

    Water heaters are another common appliance in our homes that require large amounts of power to function properly—anywhere from 500 to 4,500+ watts/hour depending on tank size and insulation levels, amongst other factors like water temperature setting and recovery rate.

    Ceiling Fans

    Ceiling fans are the most efficient appliances in the home regarding power consumption, consuming just 25-75 watts/hour.

    Computers/Laptops

    Computers and laptops are essential technology in the modern household, and their power consumption is a crucial factor to consider. Computers and laptops can range from 40 watt-hours to 200 or more depending on the processor and graphics card installed, size, and other components. On average, most computers or laptops consume around 60-90 watt-hours.

    Toasters

    Toasters are one of the most common kitchen appliances found in homes today, and they generally consume between 1,000 and 1,500 watts of power per hour. Toaster ovens require slightly more energy due to their size and extra features such as convection cooking or broiling.

    Ovens

    Ovens are one of the most energy-intensive appliances in the home. Gas ovens typically consume around 300 watts per hour, while electric ovens can use between 1,000 to 3,000 watts per hour. Electric ovens with additional features such as convection cooking or broiling can use even more energy due to their size and power requirements.

    Microwaves

    Microwaves are one of the most common and convenient kitchen appliances found in most homes today. They provide an easy way to quickly heat up food and drinks with minimal effort and energy. On average, most microwaves consume between 700 and 1,200 watts of power per hour.

    Vacuums

    Vacuum cleaners are also quite common in the average home and consume around 500 to 1,000 watts per hour, depending on the model. Vacuums with additional features such as wet/dry cleaning capabilities or HEPA filtration require more power than traditional vacuums.

    Hair dryers

    Hair dryers consume a considerable amount of power in order to quickly and efficiently dry hair. Most hair dryers range from 1,200 to 1,250 watts per hour, with professional models utilizing 2,000+ watts/per hour.

    Understanding Your Home’s Overall Energy Consumption

    It’s essential to understand how your home is using energy so that you can make sure it’s being used efficiently and cost-effectively. Here are some tips for understanding your home’s overall energy consumption.

    Know Your Appliances

    Keep track of the appliances in your home and how much power they use. Knowing this information can help you to identify which ones are using more energy than necessary and replace them with more efficient models.

    Monitor Your Utility Usage

    Monitoring your electricity usage over time can help you see where to make changes to lower costs or increase efficiency. Look for any sudden increases in use so you can take action quickly.

    Invest In Energy-Efficient Features

    Investing in energy-efficient features like double-paned windows, insulation, or smart thermostats can help reduce overall energy consumption and save time.

    Change Your Habits

    Small changes, such as turning off lights when leaving a room or unplugging electronics when not in use, can significantly reduce energy usage and save money.

    Some Facts About The Power Consumption of Household Appliances

    • The average power consumption of household appliances can range from a few hundred watts to 5,000 or more watts per hour.
    • Over 20% of the electricity used by residential homes is for lighting, while major appliances such as refrigerators and clothes washers use up to 35%.
    • Standby mode on electronics can account for 10-20% of the total energy consumed in the home.
    • Dishwashers typically use 900-2,700 watts of electricity, depending on the size and cycle settings selected.
    • Heating and cooling account for about 48% of home energy consumption in most climates.
    • Clothes dryers typically consume 1,200 to 1,250 watts per hour, with professional models utilizing 2,000+ watts/per hour.

    By being aware of the power consumption of your household appliances, you can make informed decisions on how to reduce your energy usage and save money.

    Being mindful of your energy use is essential to living sustainably and responsibly. With a few changes in behavior, you can quickly begin reducing your home’s power consumption and saving money today.

    Conclusion

    Understanding your home’s energy consumption is key to living sustainably and responsibly. Knowing how much power each appliance in the home uses can help you identify areas where energy efficiency can be improved.

    Additionally, investing in energy-efficient features for the home or changing certain habits can significantly reduce overall energy use and save money. With these tips, shown in this guide in the above content, you can quickly understand how much electricity each appliance uses and how to reduce your home’s energy consumption.

  • All RV and Camping Appliances with Their Power Consumption

    All RV and Camping Appliances with Their Power Consumption

    Whether you’re setting out on a grand adventure in an RV or planning a simple camping trip, your choice of appliances can dramatically influence the experience. The right set of RV and camping appliances can make your outdoor adventure feel like a home away from home.

    These devices are specially designed for travel, often being more compact, efficient, and sturdy to endure the rigors of the road and wilderness. From kitchen essentials like portable stoves and coolers to entertainment gadgets like compact televisions and radios to practical tools like portable heaters and washing machines, these appliances cater to a myriad of needs.

    This guide delves into the wide array of RV and camping appliances with their power consumption, and how to choose the right ones for your unique adventure.

    All RV and Camping Appliances with Their Power Consumption

    How to Determine Your Wattage Requirements for RV & Camping Appliances?

    Determining your wattage requirements for RV and camping appliances is important to ensure you have adequate power for your needs. Here’s a step-by-step guide to help you calculate your energy requirements:

    1. List All Your Appliances: Start by making a list of all the appliances and devices you plan to use during your RV trip or camping adventure. This could include everything from your RV air conditioner, refrigerator, and microwave, to smaller devices like laptops, phones, and lights.
    2. Identify the Wattage of Each Appliance: Check the wattage rating of each appliance. This information can typically be found on the appliance itself, in the user manual, or online. Remember, there are two types of wattage – running wattage (the power needed to keep the appliance running) and starting wattage (the additional power needed to start the appliance).
    3. Calculate Total Running Wattage: Add up the running wattage of all the appliances you plan to run at the same time. This will give you the total running wattage.
    4. Consider Starting Wattage: Identify the appliance with the highest starting wattage. Only one appliance usually starts at a time, so you don’t need to add up all the starting wattages.
    5. Determine Total Wattage Requirement: Your total wattage requirement is the total running wattage plus the highest starting wattage. This is the minimum power rating you should consider when looking at generators or power supplies.

    Remember that this is a general guide. For larger appliances, like air conditioners, the starting wattage can be much higher than the running wattage, and this needs to be taken into account. Also, it’s always better to have some extra capacity to handle unexpected power needs or new appliances.

    For convenience and safety, consider investing in a power inverter or generator with a power rating 20-25% higher than your calculated total wattage requirement. This buffer helps ensure that you won’t overload your power source and gives you room for additional appliances or unforeseen power needs.

    Essential RV and Camping Appliances with Their Power Consumption

    Here is a list of essential RV and camping appliances with their estimated wattage. The actual wattage can vary depending on the specific model and manufacturer.

    ApplianceEstimated Wattage
    Air conditioner (13,500 BTU)1500-2000 W
    Microwave (1000W)1000-1500 W
    Refrigerator (medium-sized)400-1000 W
    Coffee maker600-1000 W
    Toaster800-1500 W
    Electric grill1500-2000 W
    Television (32″)100-200 W
    Laptop50-100 W
    Radio50-100 W
    Electric fan50-120 W
    Light bulb (60W)60 W
    Cell phone charger5-10 W

    Remember, the actual power usage of any device or appliance can be determined by looking at its nameplate, which should list its rated power consumption.

    Also, consider that some appliances, like air conditioners and microwaves, have a higher start-up wattage that can be 2-3 times their running wattage. So, it would be best if you planned your power needs accordingly.

    Kitchen Appliances for RV & Camping with Their Estimated Wattage

    Here’s a list of common kitchen appliances for RV and camping with their estimated wattage. The actual wattage may vary depending on the specific model and manufacturer.

    Kitchen ApplianceEstimated Wattage
    RV Refrigerator (medium-sized)400-1000 W
    Microwave (1000W)1000-1500 W
    Electric Grill1500-2000 W
    Coffee Maker600-1000 W
    Toaster800-1500 W
    Electric Kettle1000-1500 W
    Slow Cooker200-300 W
    Electric Stove Single Element1200-1500 W
    Blender300-1000 W
    Electric Can Opener100-200 W
    Food Processor400-800 W

    Remember, the power rating indicated on the appliance label or manual is the best source for accurate wattage information. Also, appliances with motors or heating elements often require more power to start than they do to run, so it’s essential to account for the starting wattage when planning your power needs.

    Washing Appliances for RV & Camping with Their Estimated Wattage

    Here’s a table providing some examples of washing appliances that one might use while RVing or camping, along with their estimated wattages. Remember, actual wattage can vary based on the specific make and model of the appliance.

    ApplianceEstimated Wattage
    Portable Washing Machine200-400 W
    Portable Clothes Dryer800-1000 W
    Handheld Fabric Steamer600-1200 W
    Electric Water Heater (6 gal.)3000-4500 W
    Small Electric Kettle (for heating washing water)1000-1500 W

    Please note the above wattages are averages, and the actual power usage may vary depending on the specific model and manufacturer. Additionally, it’s important to consider the starting wattage of appliances, which can be 2-3 times higher than the running wattage.

    Entertainment Appliances for RV & Camping with Their Estimated Wattage

    Here’s a list of typical RV and camping entertainment appliances and their estimated wattage. Please remember that actual wattage can vary based on the specific model and manufacturer.

    Entertainment ApplianceEstimated Wattage
    Television (32″)100-200 W
    DVD Player20-60 W
    Satellite Receiver20-30 W
    Game Console70-200 W
    Stereo System15-50 W
    Laptop50-100 W
    Portable Speaker10-20 W
    Projector150-300 W
    Cell Phone Charger5-10 W
    Tablet Charger10-20 W

    The wattage values listed above are approximate and represent average use. Some devices might use more power during start-up or when operating at their highest settings. For the most accurate information, refer to the nameplate or user manual of the specific appliance.

    Conclusion

    The selection of the best RV and camping appliances can make a significant difference in your outdoor experiences. Choosing the right appliances, based on their functionality, durability, and power consumption, helps ensure seamless convenience and comfort, even while you’re far from home.

    Understanding their power requirements is critical in planning your energy usage and selecting the right power source, whether it’s a generator or solar power. It ensures you’ll have ample power supply without overloading your system, providing worry-free operation.

    In your quest for adventure, don’t compromise on comfort. Invest in high-quality, energy-efficient appliances that cater to your needs, and you can enjoy the best of both worlds – the thrill of the outdoors with the comforts of home.