I remember standing in my garage with a brand new MIG welder I’d spent months saving up for. The machine sat there gathering dust because I had no idea what to make first. I spent hours watching videos but felt overwhelmed by complex projects that required skills I hadn’t developed yet. What I needed were simple welding projects for beginners that would help me practice basic techniques while actually making something useful.
After eight years of welding and countless beginner projects under my belt, I’ve learned that starting with the right projects makes all the difference. Easy welding projects for beginners should focus on three things: basic joint types, forgiving materials, and practical results you’ll actually use.
The best beginner welding projects are simple tools and household items that help you master the fundamentals: butt joints, lap joints, and basic bead control. These projects typically use 16-20 gauge mild steel, which is forgiving and readily available. You’ll develop muscle memory, learn proper heat settings, and understand metal behavior without the pressure of complex fabrication.
Quick Summary: Start with practice coupons to get familiar with your machine, then progress to simple tools like clamps, stool, and shelf brackets. These beginner welding projects use basic joints and forgiving materials while building practical skills and useful items for your shop.
Why Start With Simple Projects?
When I first tried welding, I made the mistake of jumping into a trailer build project. The result was a mess of porosity, undercut, and frustration. I spent three weeks fixing mistakes that could have been avoided with proper practice. That failure cost me about $150 in materials and countless hours of grinding.
Starting with simple welding projects serves three critical purposes. You develop proper technique without the pressure of complex geometry. You build confidence through quick wins and completed projects. You create useful items for your shop while learning.
I recommend spending at least 20 hours on beginner projects before attempting anything structural. This practice time prevents costly mistakes later. Every professional welder I know mastered the basics first, and so should you.
Safety First: Essential Protection Before You Strike an Arc
Before we dive into projects, let’s talk safety. I’ve seen too many beginners skip proper protection and regret it later. Welding produces UV radiation that can burn your eyes in seconds, intense heat that causes severe burns, and metal fumes that are hazardous to breathe.
Arc Eye: A painful condition caused by UV exposure to the cornea, similar to sunburn but affecting your eyes. Symptoms appear 6-12 hours after exposure and include severe pain, light sensitivity, and a feeling of sand in your eyes.
Non-Negotiable Safety Gear
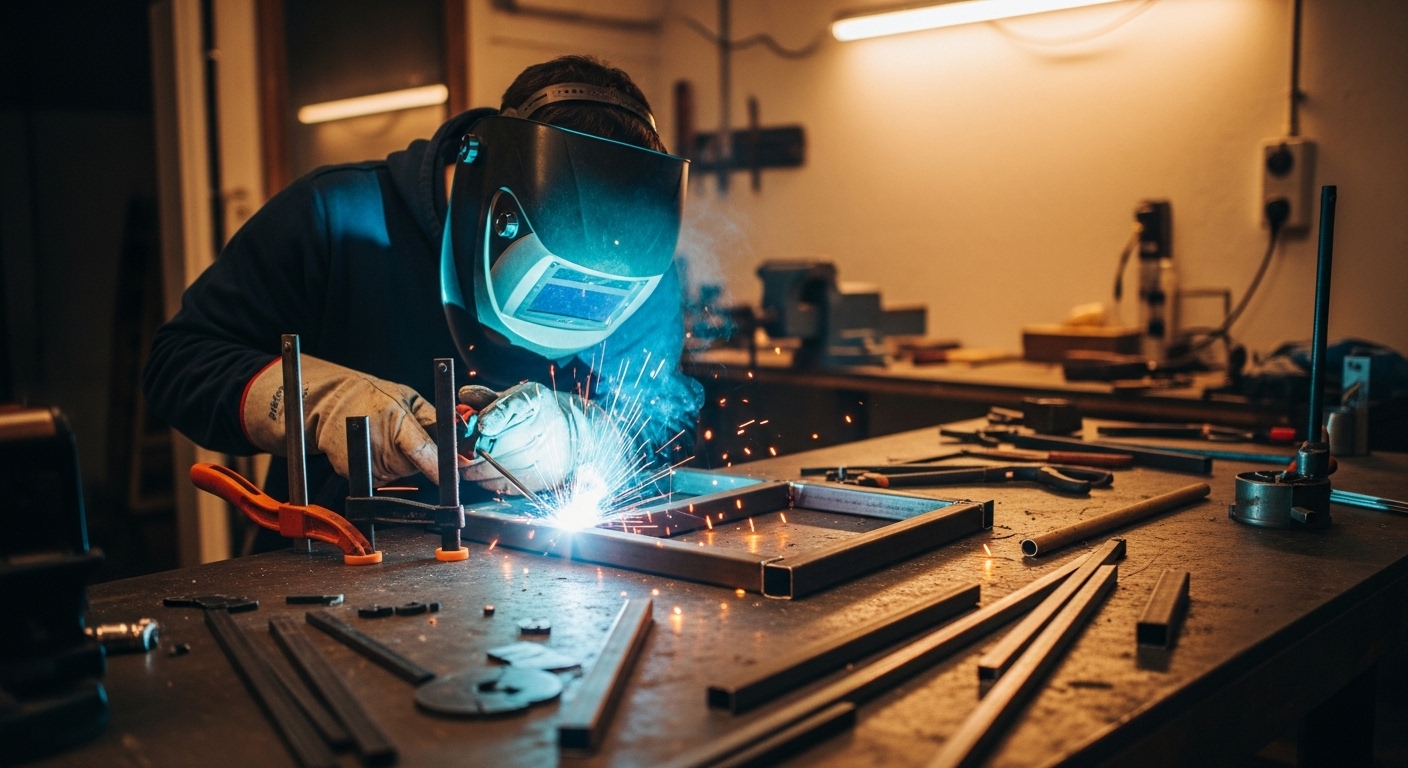
You need a proper welding helmet before you touch any equipment. Auto-darkening helmets are worth the extra cost for beginners. I recommend investing $100-150 for a quality helmet with adjustable sensitivity and delay settings. Your eyesight is worth far more than that.
Welding gloves should be leather and specifically designed for welding. Regular work gloves will melt or catch fire. I burned through three pairs of cheap gloves before learning this lesson the hard way. Expect to spend $25-40 for proper welding gloves that will last through many projects.
Flame-resistant clothing is essential. I’ve seen spark holes in t-shirts and jeans that could have been skin. A welding jacket or heavy leather apron costs $50-80 but prevents serious burns. Natural fibers like cotton and leather are your friends. Synthetic materials melt into your skin when hit by sparks.
Fire Safety and Ventilation
Keep a fire extinguisher rated for ABC fires within 10 feet of your welding area. I’ve had two small fires start from falling sparks over the years. The extinguisher saved my garage both times. A 5-pound ABC extinguisher costs about $40 and is non-negotiable equipment.
Proper ventilation is critical. Welding produces fumes containing metal oxides and other hazardous substances. I weld in my garage with the door open and a fan running. For indoor welding without adequate ventilation, you need a respirator rated for metal fumes. Expect to spend $30-50 for a quality respirator that will protect your lungs.
Clear your welding area of flammable materials for at least 35 feet in all directions. I once caught a cardboard box on fire 20 feet away from my welding table. Sparks travel farther than you think. A welding curtain or blanket helps contain sparks and protects surrounding areas.
Essential Tools and Materials For Your First Projects
Having the right tools makes beginner welding projects much easier and more enjoyable. I started with minimal equipment and spent twice as long completing simple tasks. Here’s what you actually need to get started without breaking the bank.
Choosing Your First Welder
MIG welding is the easiest process for beginners. It’s forgiving, versatile, and relatively quick to learn. I recommend starting with a 110V MIG welder that runs on standard household current. These machines cost $300-500 and can handle most beginner projects.
| Welding Type | Difficulty | Best For | Starting Cost |
|---|---|---|---|
| MIG | Easiest | Beginners, thin metal, general fabrication | $300-500 |
| Flux Core | Easy | Outdoor welding, dirty metal, budget option | $150-300 |
| Stick | Moderate | Thick metal, outdoor, farm/repair | $200-400 |
| TIG | Most Difficult | Precise work, thin metal, aluminum, stainless | $400-800+ |
Flux-core welding is a budget-friendly alternative if you can’t afford gas shielding. The wire creates its own shield as it burns, making it ideal for outdoor welding. I used flux-core for my first six months and completed many beginner projects with decent results.
Must-Have Tools (No Shortcuts)
An angle grinder is indispensable for metal preparation and cleanup. A 4-1/2 inch angle grinder with cutting and grinding wheels costs $60-100. I use mine on every single project for cutting material to size, cleaning weld areas, and smoothing beads after welding.
Clamps are your best friend in welding. You cannot weld effectively without holding pieces securely. I recommend starting with at least four C-clamps and two locking pliers. Vise grips and welding magnets are also incredibly helpful. Budget $50-80 for a basic clamp collection that will serve you well.
A wire brush and chipping hammer are essential for weld cleanup. The wire brush removes oxidation before welding and scale after. The chipping hammer removes flux from stick and flux-core welds. These basic tools cost less than $20 total but are used constantly.
A square and marking tools ensure accurate layout. A combination square and permanent marker cost about $25 together. Accurate layout prevents frustrating mistakes and produces professional-looking results.
Materials For Beginner Projects
Mild steel is the most beginner-friendly metal. It’s forgiving, readily available, and inexpensive. I recommend starting with 16-20 gauge sheet metal and 1-1/2 inch square tubing with 1/8 inch wall thickness. These materials are thick enough to weld easily without burn-through but thin enough to cut with basic tools.
Local metal suppliers often sell drop pieces and remnants at discounted prices. I’ve built entire projects from scrap bins for under $20. Steel yards are also great sources for affordable materials. Expect to pay $2-4 per pound for mild steel in small quantities.
15 Easy Welding Projects For Beginners (Ranked by Difficulty)
Here are fifteen beginner-friendly welding projects organized by difficulty. Each project builds specific skills while producing something useful. I’ve completed all of these projects myself and can attest to their value for developing fundamental welding skills.
Difficulty Scale
1: Absolute beginner – Perfect first project
2: Very easy – Minimal skills required
3: Easy – Basic welding skills helpful
4: Moderate – Some experience recommended
5: Challenging – Requires solid fundamentals
- Practice Coupons – Difficulty: 1 – Time: 1 hour – Cost: $5
- Welding Clamps – Difficulty: 1 – Time: 2 hours – Cost: $15
- Simple Shelf Brackets – Difficulty: 1 – Time: 2 hours – Cost: $10
- Tool Holder – Difficulty: 2 – Time: 3 hours – Cost: $20
- Shop Stool – Difficulty: 2 – Time: 4 hours – Cost: $35
- Fire Pit Ring – Difficulty: 2 – Time: 3 hours – Cost: $40
- Garden Plant Stand – Difficulty: 2 – Time: 3 hours – Cost: $25
- Welding Table Frame – Difficulty: 3 – Time: 6 hours – Cost: $100
- Utility Cart – Difficulty: 3 – Time: 8 hours – Cost: $80
- Toolbox – Difficulty: 3 – Time: 6 hours – Cost: $60
- BBQ Pit Frame – Difficulty: 3 – Time: 8 hours – Cost: $120
- Workbench – Difficulty: 4 – Time: 10 hours – Cost: $150
- Motorcycle Lift Table – Difficulty: 4 – Time: 12 hours – Cost: $200
- Drum Smoker – Difficulty: 4 – Time: 10 hours – Cost: $180
- Bed Frame – Difficulty: 5 – Time: 15 hours – Cost: $250
Detailed Project Instructions
1. Practice Coupons – The Essential First Project
Before making anything, you need practice. Practice coupons are scrap metal pieces specifically for testing your welds. This project costs almost nothing and prevents frustration on actual projects later.
What You’ll Learn: Basic machine setup, bead formation, travel speed, heat control, and proper gun angle. These are the foundation skills for all welding.
Materials Needed:
- 16-20 gauge mild steel pieces, 3×3 inches (at least 20 pieces)
- Welding wire appropriate for your material thickness
- Shielding gas (75% argon/25% CO2) if using MIG
Step 1: Clean all metal surfaces to bare metal using a wire brush or grinder. Remove any rust, paint, or oil. Clean metal welds easily. Dirty metal produces porosity and weak welds.
Step 2: Set your welder according to the manufacturer’s recommendations for your material thickness. For 16-18 gauge with a 110V MIG, start around 17-19 volts and wire speed 40-50 IPM. Make test welds and adjust until you get a smooth, steady arc.
Step 3: Practice laying beads on flat plate. Focus on maintaining consistent gun angle (15 degrees from vertical, pushing direction) and steady travel speed. Your goal is a bead that looks like a stack of dimes laying on their sides.
Step 4: Practice butt joints by placing two pieces edge-to-edge with a 1/8 inch gap. Tack weld both ends, then fill the joint. These are the most common joints you’ll use in real projects.
Step 5: Practice lap joints by overlapping two pieces 1/2 inch. Weld along the edge of the top piece. This joint is very forgiving and great for beginners.
Step 6: Practice T-joints by placing one piece perpendicular to another. Weld along the joint where pieces meet. This teaches you gun manipulation and heat control.
Common Problems:
- Porosity: Small holes in weld – usually caused by dirty metal or improper gas coverage
- Undercut: Groove at the toe of the weld – caused by too much heat or improper angle
- Burn-through: Melted through the material – reduce heat or slow travel speed
- Lack of fusion: Weld sits on top without penetrating – increase heat or slower speed
2. Simple Welding Clamps – Ultra-Useful Shop Tools
These simple C-style welding clamps are incredibly useful and teach you basic fabrication skills. I’ve made dozens of these over the years and use them constantly in my shop.
What You’ll Learn: Square tube fabrication, simple assembly, welding dissimilar thicknesses, and making functional tools. These clamps will be among your most-used shop items.
Materials Needed:
- 1-1/2 inch square tubing, 1/8 inch wall – 2 feet per clamp
- 3/8 inch round bar or threaded rod – 6 inches per clamp
- 3/8 inch nuts (2 per clamp)
- Total cost per clamp: approximately $15
Step 1: Cut your square tubing into two pieces: one 12 inches for the main body, one 6 inches for the sliding arm. Use your angle grinder with a cutting wheel for clean cuts. Wear safety glasses and hearing protection.
Step 2: On the 12-inch piece, mark 3 inches from one end. This will be your bending point. Heat this area with a torch until cherry red, then bend the tubing to a 90-degree angle. Use a vise or square to ensure a clean 90-degree bend.
Step 3: Drill a 3/8 inch hole through both walls of the 6-inch piece, 1 inch from one end. This is where your threaded rod will pass through. Deburr the holes thoroughly.
Step 4: Position the 6-inch piece inside the long leg of the bent piece, about 2 inches from the end. Tack weld in place. Check that it slides freely before welding completely.
Step 5: Weld the sliding arm completely on both sides. Use small stitches to avoid overheating the thin tubing. Let it cool between passes.
Step 6: Thread two nuts onto the threaded rod. Weld one nut to the end of the rod (this becomes your handle). Insert the rod through the hole and tighten the second nut against the outside of the tubing.
Project Variations:
- Make different sizes for various applications
- Add rubber pads to the clamp faces for better grip
- Use flat bar instead of square tubing for different styles
3. Simple Shelf Brackets – Quick and Useful
Shelf brackets are among the easiest welding projects for beginners. They’re simple, practical, and teach basic joint welding. I’ve made dozens of these for garage organization.
What You’ll Learn: Simple fabrication, accurate layout, bracket design, and basic shelf support calculations. These brackets will support 50-75 pounds each when properly installed.
Materials Needed:
- 1/8 inch flat bar, 2 inches wide – 3 feet per bracket
- Angle iron 2x2x1/8 inch – 1 foot per bracket
- Total cost per bracket: approximately $10
Step 1: Cut one piece of flat bar to 12 inches for the horizontal shelf support. Cut another piece to 8 inches for the vertical wall mount. Cut angle iron to match the diagonal length (approximately 10 inches).
Step 2: Lay out your pieces in an L-shape. The 12-inch horizontal piece should overlap the vertical piece by 2 inches. Mark this overlap and grind a slight bevel on the mating surfaces for better penetration.
Step 3: Tack weld the horizontal and vertical pieces together. Check that they form a true 90-degree angle using your square. Adjust if needed before final welding.
Step 4: Weld the L-joint completely on both sides. Use a weaving technique for thicker material or straight beads for thinner metal. Let cool completely.
Step 5: Position the diagonal brace from the outer corner of the L to the inner corner. Tack in place, then weld both ends. This brace dramatically increases load capacity.
Step 6: Drill mounting holes in the vertical piece. Use two holes for strength, spaced 6 inches apart. Deburr all holes and clean all welds with a wire brush.
Installation Tips:
- Use at least 1/4 inch lag screws into wall studs
- Space brackets no more than 24 inches apart for heavy loads
- Level brackets before securing for proper shelf alignment
4. Tool Holder – Organize Your Workshop
A simple tool holder keeps your wrenches, pliers, and other tools organized and visible. This project uses minimal materials and teaches basic fabrication with multiple small parts.
What You’ll Learn: Small part welding, rack fabrication, spacing techniques, and creating functional storage. This organizer will hold 20-30 tools depending on size.
Materials Needed:
- 1/8 inch flat bar, 1 inch wide – 4 feet total
- 1/4 inch round bar – 2 feet total
- 1/8 inch plate for backing (optional)
- Total cost: approximately $20
Step 1: Cut a piece of flat bar 24 inches long for the main support rail. Cut ten pieces of round bar, each 3 inches long. These will become your tool holders.
Step 2: Mark positions on the support rail for your tool holders. Space them 2 inches apart. Use a permanent marker and square for accurate layout.
Step 3: Tack each round bar piece perpendicular to the support rail at your marked positions. Start with the center pieces and work outward. This prevents heat buildup and warping.
Step 4: After tacking all pieces, check alignment. All tool holders should be perpendicular and evenly spaced. Adjust if needed before final welding.
Step 5: Weld each joint completely. Weld both sides of each round bar where it meets the rail. Alternate sides to distribute heat and prevent warping.
Step 6: Drill mounting holes in the main rail at 12-inch centers. Clean all welds and paint if desired. Mount to your wall using appropriate screws for your wall type.
5. Shop Stool – Comfortable and Customizable
A shop stool is a practical project that introduces you to 3D fabrication. This stool has a welded steel frame and uses wood for the seat, which keeps costs down while teaching valuable skills.
What You’ll Learn: Three-dimensional fabrication, square frame construction, splayed leg techniques, and mixed-material projects. This stool will support 300+ pounds.
Materials Needed:
- 1-inch square tubing, 14 gauge – 16 feet total
- 1/2 inch square tubing for seat frame – 8 feet
- Wood board (12×12 inch minimum) for seat
- Wood screws for seat mounting
- Total cost: approximately $35
Step 1: Cut four leg pieces 24 inches long. Cut four braces connecting top of legs (12 inches each). Cut four braces for mid-leg support (8 inches each). Use a miter saw or cut-off saw for square cuts.
Step 2: Lay out two legs with a 12-inch brace at the top. The legs should splay outward at the bottom for stability. A 10-degree angle works well. Tack weld the brace to both legs.
Step 3: Add mid-leg braces at 12 inches from the bottom. These provide lateral stability. Tack weld in place. You now have one side of the stool frame.
Step 4: Repeat steps 2-3 for the second side. Then connect both sides with front and back braces at the top. Check that the frame is square and level before final welding.
Step 5: Weld all joints completely. Work your way around the frame systematically. Let each joint cool slightly before moving to the next to prevent excessive heat buildup.
Step 6: Create a seat frame from 1/2 inch tubing. Weld to the top of the stool. Cut a wood seat slightly larger than the frame and secure with wood screws from underneath.
Customization Ideas:
- Add wheels to the legs for mobility
- Add a footrest bar 8 inches from the ground
- Adjust seat height to your preference
- Use thicker wood for a more substantial seat
6. Fire Pit Ring – Perfect for Backyard Gatherings
A simple fire pit ring is an excellent beginner project that produces an impressive result. This project teaches circular welding and techniques for working with thinner materials.
What You’ll Learn: Circular welding, thin metal techniques, ring fabrication, and outdoor project considerations. This fire pit creates a 30-inch diameter burning area.
Materials Needed:
- 10 gauge steel sheet – 4×4 foot piece
- 2x2x1/4 inch angle iron for rim – 8 feet
- 1/2 inch round bar for decorative elements (optional)
- Total cost: approximately $40
Step 1: Roll or bend your sheet metal into a cylinder 30 inches in diameter. If you don’t have a roller, use a tree or post as a forming die and gradually bend the metal around it.
Step 2: Tack weld the seam where the sheet meets itself. Check that the cylinder is reasonably round. Small adjustments can be made before final welding.
Step 3: Weld the seam completely. Use short stitches and let cool between passes. Thin sheet metal warps easily with excessive heat.
Step 4: Cut angle iron to fit around the top rim of your cylinder. This should be approximately 94 inches (30 inches x 3.14). Tack in place around the perimeter.
Step 5: Weld the angle iron to the cylinder top. Work around the circumference, welding 2 inches at a time and moving to the opposite side. This technique minimizes warping.
Step 6: Add legs if desired. Three legs of 1/2 inch round bar, 12 inches long, welded evenly spaced around the bottom, provide stable support.
7. Garden Plant Stand – Decorative and Functional
A plant stand is an excellent project that introduces artistic elements and teaches techniques for creating pleasing designs. This simple stand holds multiple pots and looks great in any garden.
What You’ll Learn: Artistic welding, balanced design, multi-level construction, and outdoor finish techniques. This stand holds 3-6 pots depending on size.
Materials Needed:
- 1/2 inch square tubing – 12 feet
- 1/4 inch flat bar for shelves – 6 feet
- 1/4 inch round bar for decorative elements (optional)
- Total cost: approximately $25
Step 1: Decide on your design. A simple tiered design works well for beginners. Plan for 3-4 shelves at different heights. A 48-inch height with shelves at 12, 30, and 48 inches is functional.
Step 2: Cut four vertical support pieces to your desired height. These will be the main legs of your stand. Cut shelf pieces from flat bar to create the platforms for pots.
Step 3: Lay out two legs flat on your welding table. Position shelf pieces between them at your planned heights. Tack weld each shelf to both legs.
Step 4: Repeat with the other two legs. You now have two side panels. Connect them with cross braces at the top and middle for stability.
Step 5: Weld all joints completely. Work systematically and check squareness frequently. Use your square to ensure shelves are level.
Step 6: Add decorative elements if desired. Curved pieces of round bar can add visual interest. Clean all welds and apply outdoor paint for weather protection.
8. Welding Table Frame – The Foundation of Your Shop
A proper welding table is essential for quality work. Building the frame yourself saves money and teaches valuable fabrication skills. This project represents a significant step up in complexity.
What You’ll Learn: Large frame construction, flatness techniques, heavy-gauge welding, and precision layout. This table provides a 30×60 inch work surface.
Materials Needed:
- 2x2x1/4 inch square tubing – 30 feet
- 2x2x3/16 inch angle iron – 10 feet
- 1/2 inch round bar for legs – 8 feet
- Steel plate for top (optional)
- Total cost: approximately $100
Step 1: Cut frame pieces. For a 30×60 inch table, cut two pieces 60 inches and two pieces 30 inches (outside dimensions). Cut four legs 32-36 inches depending on your desired working height.
Step 2: Lay out the frame pieces on a flat surface. A concrete floor works well. Tack the corners, checking for squareness. Measure diagonals – they should be equal.
Step 3: Add internal braces. Cross-bracing or perimeter bracing every 12-15 inches prevents flex. Tack these in place, checking that the frame remains flat.
Step 4: Weld the frame completely. Work in a pattern that distributes heat evenly. Weld one corner, then the opposite corner, then the remaining two.
Step 5: Attach legs at the corners. Use angle iron brackets for strength. The legs should be inset slightly from the corners for stability. Weld completely.
Step 6: Add caster mounts if desired mobility is needed. A steel plate top can be added later or bolted on. Paint the frame to prevent rust.
Professional Tip:
Keep your table surface clean and flat. Welding on dirty or rusty surfaces contaminates your weld. A clean, flat table is one of the most important tools in your shop.
Beginner Tips and Troubleshooting
After eight years of welding and teaching beginners, I’ve identified the most common problems and their solutions. These tips will save you frustration and accelerate your progress.
Most Common Beginner Mistakes
1. Welding on dirty metal: This accounts for about 60% of beginner welding problems. Always clean to bare metal. A wire wheel on your angle grinder makes quick work of surface contamination. I keep dedicated clean rags in my shop for wiping down metal right before welding.
2. Improper machine settings: Beginners often use settings from the internet without considering their specific machine and material. Always start with manufacturer recommendations and adjust based on test welds. Keep a notebook of settings that work for different materials.
3. Moving too fast or too slow: Travel speed dramatically affects weld quality. Too fast creates narrow, ropey beads with poor penetration. Too slow creates excessive buildup and heat distortion. Watch the puddle and adjust speed to maintain consistent width.
4. Wrong gun angle: A 15-degree angle from vertical, pushing the weld, is standard for most MIG welding. Too steep an angle causes poor penetration and spatter. Too shallow reduces gas coverage and increases porosity.
5. Improper joint fit-up: Gaps that are too wide or too tight make welding difficult. Aim for consistent 1/8 inch gaps on butt joints. Use clamps and tack welds to maintain alignment during welding.
Quick Troubleshooting Guide
| Problem | Cause | Solution |
|---|---|---|
| Porosity (holes in weld) | Dirty metal, no gas, wind | Clean metal, check gas, block wind |
| Undercut | Too hot, fast travel, wrong angle | Reduce heat, slow down, adjust angle |
| Burn-through | Too hot, slow travel, thin metal | Reduce settings, speed up, use backing |
| Lack of fusion | Too cold, fast travel | Increase heat, slow travel |
| Excessive spatter | Wrong settings, dirty metal | Adjust voltage/wire speed, clean metal |
| Warping | Too much heat, no clamping | Use fewer passes, clamp firmly |
Skill Development Tips
Practice consistently rather than in marathon sessions. Thirty minutes daily produces better results than four hours once a week. Muscle memory develops through repetition, and fresh hands make better welds.
Document your settings and results. Take photos of your test welds and note the machine settings used. This reference guide becomes invaluable over time. I still refer to my notebook from years ago when welding unfamiliar materials.
Don’t be afraid to grind and redo. Even professionals occasionally need to redo welds. The key is recognizing problems early and correcting them. Practice cut-and-reweld on scrap until you’re satisfied with results.
Join welding communities and seek feedback. Online forums, local welding classes, and experienced welders provide invaluable guidance. Post photos of your welds and ask for constructive criticism. I learned more in six months of active forum participation than in two years of solo practice.
What’s Next: Progressing Beyond Beginner Projects
Once you’ve completed these beginner welding projects, you’ll have developed solid fundamental skills. The transition to intermediate projects involves more complex joints, thinner materials, and tighter tolerances.
Consider progressing to projects like furniture fabrication, trailer building, automotive repair, or artistic welding. Each specialty requires adapting your fundamental skills to specific applications.
For those interested in professional welding, consider community college courses or certification programs. Formal training provides structured learning and industry-recognized credentials. Many community colleges offer excellent evening programs for working adults.
Remember that every professional welder started exactly where you are now. The projects in this guide represent time-tested learning opportunities that build real skills while creating useful items. Take your time, focus on quality over speed, and enjoy the process of learning a valuable craft.
Frequently Asked Questions
What are good first welding projects?
The best first welding projects are practice coupons to learn basic bead control, followed by simple tools like welding clamps and shelf brackets. These projects teach fundamental techniques while producing useful items. Start with 20 practice welds on scrap metal before attempting actual projects. This builds muscle memory and helps you understand your machine’s settings.
What should a beginner welder make first?
Start with practice coupons to test different machine settings and techniques. Once comfortable, make simple C-clamps or shelf brackets as your first functional projects. These require only basic joints and forgiving materials. Complete at least 20 practice welds on scrap before moving to actual projects. This approach prevents frustration and ensures you develop proper technique from the start.
What is the easiest thing to weld?
Lap joints are the easiest welds for beginners. They involve overlapping two pieces of metal and welding along the edge. This joint type is very forgiving and allows you to focus on bead formation without worrying about perfect fit-up. Use 16-20 gauge mild steel for your first attempts. The material is thick enough to prevent burn-through but thin enough to weld easily with standard MIG settings.
What tools do I need to start welding?
You need a MIG welder, auto-darkening helmet, welding gloves, leather jacket or apron, angle grinder with cutting and grinding wheels, C-clamps or locking pliers, wire brush, chipping hammer, and a square. Budget approximately $500-800 for basic setup. Don’t skip safety equipment to save money. Proper protection prevents serious injuries and makes learning much more comfortable. A fire extinguisher rated for ABC fires is also non-negotiable equipment.
What materials are best for beginner welding projects?
Mild steel in 16-20 gauge thickness is ideal for beginners. It’s readily available, inexpensive, and forgiving to weld. Start with flat sheet and 1/8 inch wall square tubing. These materials work well with standard MIG settings and are thick enough to prevent burn-through. Avoid aluminum and stainless steel until you’ve mastered basic techniques. These materials require different processes and are much less forgiving of mistakes.
How do I practice welding?
Start with practice coupons – scrap metal pieces specifically for testing welds. Practice laying beads on flat plate, then progress to butt joints, lap joints, and T-joints. Focus on consistent gun angle, steady travel speed, and proper heat settings. Spend at least 20 hours practicing before attempting actual projects. Take photos of your test welds and document machine settings. This reference guide helps you understand what works and what doesn’t.
What type of welding is best for beginners?
MIG welding is the easiest process for beginners. It’s forgiving, versatile, and relatively quick to learn. MIG welders produce clean welds with minimal spatter and work well on thin materials. Flux-core welding is a budget-friendly alternative that doesn’t require shielding gas. TIG welding offers the most control but has the steepest learning curve. Start with MIG, then explore other processes as your skills develop.
How much does it cost to start welding?
Basic MIG welding setup costs $500-800 for equipment, including a 110V MIG welder ($300-500), auto-darkening helmet ($100-150), welding gloves ($25-40), leather jacket or apron ($50-80), angle grinder ($60-100), clamps ($50-80), and miscellaneous supplies. Budget an additional $100-200 for materials for your first several projects. You can reduce costs by buying used equipment and starting with flux-core welding instead of MIG with gas.
How long does it take to learn basic welding?
Most people develop basic competency in 40-60 hours of practice over 2-3 months. Consistent daily practice of 30 minutes produces better results than weekly marathon sessions. Focus on quality over quantity. Master basic joints before attempting complex projects. After completing 10-15 beginner projects, most people can tackle intermediate fabrication work. Consider formal training if you want to pursue welding professionally.
Leave a Reply